Camera Face Detection in C# using Emgu CV and WPF
Detecting faces from an image is simple with the power of Emgu CV, wrapper of OpenCV in .NET
Hi there, this is a new tutorial category in my blog. It’s Computer Vision. In this blog, I’d like to show you something cool. It’s how to perform Face Detection using your camera or Webcam. You’ll see how your application can detect faces from a captured image. Curious about it? Let’s take a look how to do that.
This what you need to follow this tutorial:
- Microsoft Visual Studio 2010. Or if you don’t have one, you can use 2008 version.
- Emgu CV (OpenCV in .NET). You can download the latest version in this link: www.emgu.com/wiki/index.php/Main_Page and follow the installation instruction.
- Basic Knowledge of C# Programming.
- Familiar in WPF Development.
After you’ve got what you need, it’s time to rock!

Step 1
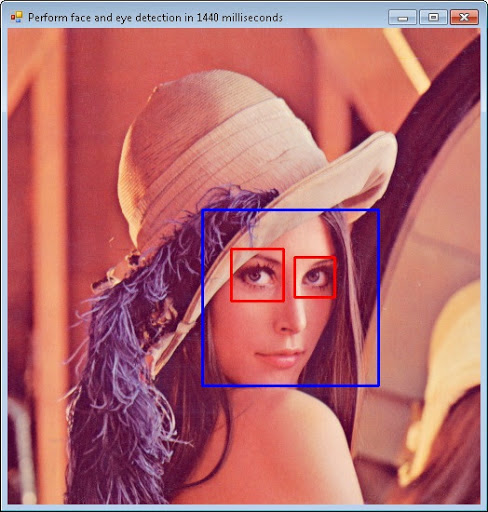
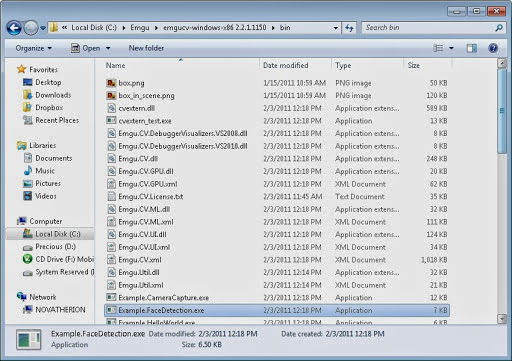
First thing you should do is installing Emgu CV. Your installation path should be like C:\Emgu\emgucv-windows-x86 2.2.1.1150. And you can see inside C:\Emgu\emgucv-windows-x86 2.2.1.1150\bin some DLLs and sample programs. You can see a simple face detection app Example.FaceDetection.exe and you’ll see something like the first picture in this post.

Step 2
Next, let’s open your Visual Studio and create a new WPF Project. Add some references and make sure it’ll look like the picture below:

Step 3
Now, copy code below to make our user experience. Put this code in your MainWindow.xaml file
<Window x:Class="WpfFaceDetectionTest.MainWindow"
    xmlns="//schemas.microsoft.com/winfx/2006/xaml/presentation"
    xmlns:x="//schemas.microsoft.com/winfx/2006/xaml"
    Title="MainWindow" Height="600" Width="800" Loaded="Window_Loaded">
  <Grid>
    <Image Name="image1" Stretch="Fill" />
  </Grid>
</Window>
Step 4
Next, let’s code it! Open your MainWindow.xaml.cs and add this code on top.
using System;
using System.Windows;
using System.Windows.Controls;
using System.Windows.Media.Imaging;
using System.Windows.Threading;
using Emgu.CV.Structure;
using Emgu.CV;
using System.Runtime.InteropServices;
Step 5
Initialize two objects Capture and HaarCascade. Those are important class in this tutorial, so you have to make it. And we also need DispatcherTimer to capture the picture every millisecond.
private Capture capture;
private HaarCascade haarCascade;
DispatcherTimer timer;

public MainWindow()
{
  InitializeComponent();
}

private void Window_Loaded(object sender, RoutedEventArgs e)
{
  capture = new Capture();
  haarCascade = new HaarCascade(@"haarcascade_frontalface_alt_tree.xml");
  timer = new DispatcherTimer();
  timer.Tick += new EventHandler(timer_Tick);
  timer.Interval = new TimeSpan(0, 0, 0, 0, 1);
  timer.Start();
}
Step 6
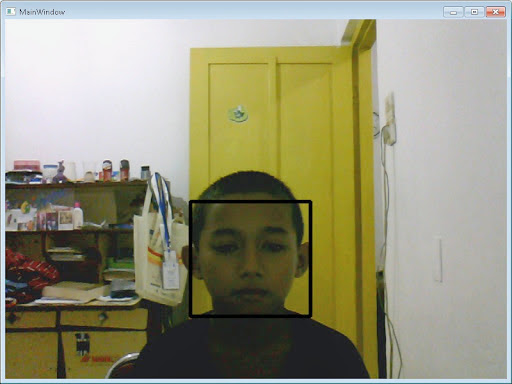
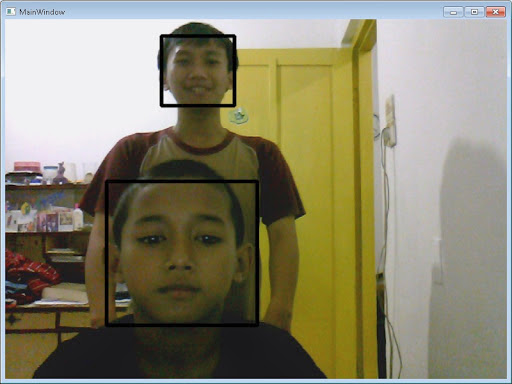
This last part is the routine. What this code will do is capture image every millisecond, and then convert it to gray frame. After converted, faces will be detected. Each detected faces will be marked by black rectangular.
void timer_Tick(object sender, EventArgs e)
{
  Image<Bgr,Byte> currentFrame = capture.QueryFrame();

  if (currentFrame != null)
  {
    Image<Gray, Byte> grayFrame = currentFrame.Convert<Gray, Byte>();

    var detectedFaces = grayFrame.DetectHaarCascade(haarCascade)[0];

    foreach (var face in detectedFaces)
      currentFrame.Draw(face.rect, new Bgr(0, double.MaxValue, 0), 3);

    image1.Source = ToBitmapSource(currentFrame);
  }

}
Step 7
Finally, this additional code is needed to convert plain Bitmap class to BitmapSource so WPF can read it as an image and view it on image1.
[DllImport("gdi32")]
private static extern int DeleteObject(IntPtr o);

public static BitmapSource ToBitmapSource(IImage image)
{
  using (System.Drawing.Bitmap source = image.Bitmap)
  {
    IntPtr ptr = source.GetHbitmap(); //obtain the Hbitmap

    BitmapSource bs = System.Windows.Interop
      .Imaging.CreateBitmapSourceFromHBitmap(
      ptr,
      IntPtr.Zero,
      Int32Rect.Empty,
      System.Windows.Media.Imaging.BitmapSizeOptions.FromEmptyOptions());

    DeleteObject(ptr); //release the HBitmap
    return bs;
  }
}
Here is the result of our work:


Okay, I think that’s all I can do in this post. See you to my next post.
Note : If you can’t run your project, just build it and make sure all opencv_xxxx.dll files and haarcascade_frontalface_alt_tree.xml in the same directory with your executable file. You can find those files inside C:\Emgu\emgucv-windows-x86 2.2.1.1150\bin.
References
Emgu CV: OpenCV in .NET (C#, VB, C++ and more)
Download Links
Fork or download the completed project on GitHub.
Further Reading
If you’re interested in Computer Vision topic, not just limited to face detection, I suggest to read the latest book written by Dr. Adrian Kaehler and Dr. Gary Rost Bradski: Learning OpenCV 3 (or the older Learning OpenCV book published in 2008, which is cheaper in price but using the old API).
Even though the code samples are written in C/C++, you can easily transform it into C# with Emgu CV wrapper.

![Can't Open Form [Design] View in WinForms Project How to fix Visual Studio projects that are unable to open Form Designer.](https://blogger.googleusercontent.com/img/b/R29vZ2xl/AVvXsEigeDK5NCfDCffwHjknWo0zztz911od3mT87ifPReZ7dWplBiRwhIys-6Y-F9JIdv9_VoqpmAup_w9_HjtXx8qAKF3s4Cdj-yWCcJUFehWZkfqmxPQ6lcvCpEnrpkEdm7SlGtzBp1VRhLYS1leNM-B9yvhrYJXWqhH2sroZY9cPxKdJ4A5L3NoG5Z2o6Bd-/s1280/junian-dev-banner.jpg)
