How To Draw 2D Primitive Objects with C++ .NET
Beginner guide to draw shapes on Windows Forms
First of all, I’d like to present my first tutorial about C++ / CLI CLR .NET Programming. This time it’s about Graphical User Interface in C++ .NET (in this case, I don’t want to use native C++). Okay, I assume that you have a little knowledge about C++ .NET GUI and of course, I also assume that you understand how to program in C++ CLR behaviour. So, here we go the tutorial!
I almost forgot, before we start this kind of tutorial, I’d like to tell you about what IDE that I used. Maybe you already know, I use Microsoft Visual Studio 2008 Professional Edition. You don’t have it? Then maybe you could use the Express edition, or you can use the old version such as Visual Studio 2005. Okay, Let’s start the tutorial.
Step 1
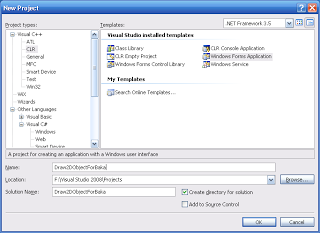
Create a new project. Press File → New → Project…. Choose C++ → CLR → Windows Forms Application and name your project Draw2DObjectForBaka.
Step 2
What to do next? Take a break, you’ve successfully create a new Windows Form. Congratulations! Now, let’s try to make some 2D Objects on this Form. How to make it? It’s easy. First, choose Paint event and make a function to handle this event.

Step 3
Now, let’s create some 2D objects onto the Form. First, let’s try to make a circle, a rectangle, and an ellipse. It’s easy, Just copy the following code:
private: System::Void Form1_Paint(System::Object^ sender,
System::Windows::Forms::PaintEventArgs^ e) {
  Graphics^ g = e->Graphics;

  //create an ellipse with
  // Black color
  // start position = (10, 10)
  // (start position is always Top Left of the object)
  // width = 75 px, height = 50 px
  g->DrawEllipse(Pens::Black, 10, 10, 75, 50);

  //create an ellipse with
  // Red color
  // start postion = (90, 10)
  // width = 75 px, height = 75 px
  //or you can say create a circle with
  // Red color
  // start position = (90, 10)
  // diameter = 75 px
  g->DrawEllipse(Pens::Red, 90, 10, 75, 75);

  //create a rectangle with
  // Blue color
  // start position = (170, 10)
  // width = 75, height = 75
  g->DrawRectangle(Pens::Blue, 170, 10, 75, 75);
}
Step 4
Try to run your program. Press F5 or Debug - Start Debugging and you’ll see something like this:
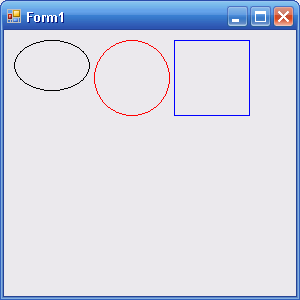
You did it! Now, let’s see the objects. Feel boring right? So, how about we try to fill the color inside the object? Let’s go to the next step.
Step 5
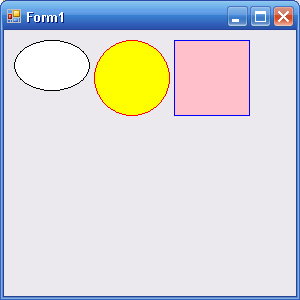
Now, let’s try to make the objects filled with color. Edit your code until become like the following code:
private: System::Void Form1_Paint(System::Object^ sender,
System::Windows::Forms::PaintEventArgs^ e) {
  Graphics^ g = e->Graphics;

  //fill an ellipse with
  // White color
  // start position = (10, 10)
  // (start position is always Top Left of the object)
  // width = 75 px, height = 50 px
  g->FillEllipse(Brushes::White, 10, 10, 75, 50);

  //create an ellipse with
  // Black color
  // start position = (10, 10)
  // (start position is always Top Left of the object)
  // width = 75 px, height = 50 px
  g->DrawEllipse(Pens::Black, 10, 10, 75, 50);

  //fill a circle with
  // Yellow color
  // start position = (90, 10)
  // diameter = 75 px
  g->FillEllipse(Brushes::Yellow, 90, 10, 75, 75);

  //create an ellipse with
  // Red color
  // start postion = (90, 10)
  // width = 75 px, height = 75 px
  //or you can say create a circle with
  // Red color
  // start position = (90, 10)
  // diameter = 75 px
  g->DrawEllipse(Pens::Red, 90, 10, 75, 75);

  //fill a rectangle with
  // Pink color
  // start position = (170, 10)
  // width = 75, height = 75
  g->FillRectangle(Brushes::Pink, 170, 10, 75, 75);

  //create a rectangle with
  // Blue color
  // start position = (170, 10)
  // width = 75, height = 75
  g->DrawRectangle(Pens::Blue, 170, 10, 75, 75);
}
Then, try to run your program one more time, and you’ll see something cool like this:
Step 6
Looks great, right? But, if you see the picture, it’s not smooth enough. Now, let’s add a line of code g->SmoothingMode = Drawing2D::SmoothingMode::HighQuality; to make the image looks smooth (or you can say, High Quality image).
private: System::Void Form1_Paint(System::Object^ sender,
System::Windows::Forms::PaintEventArgs^ e) {
  Graphics^ g = e->Graphics;

  //make the image become High Quality
  g->SmoothingMode = Drawing2D::SmoothingMode::HighQuality;

  //fill an ellipse with
  // White color
  ...
  ...
  ...
  ...
}
Try run your program and compare it with the result before.
Step 7
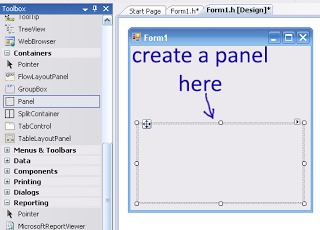
Now, how can I draw the objects onto the Panel? It’s an easy task. First, create a Panel onto your form, and choose Paint event of the Panel object.
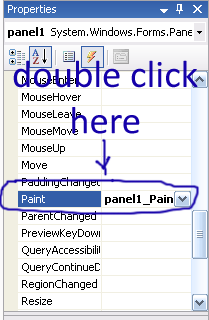
Step 8
Copy the Code from Form1_Paint into panel1_Paint. Try to run your program, and see the result.

Okay, I think that’s all about how to draw 2D objects onto Form and Panel. Hope this simple kind of tutorial gives you a good knowledge.
Downloads
Fork or download the completed project on GitHub.
Cover Photo by Jess Watters on Unsplash.
